Update: January 2019

This update has many new exciting features ranging from platform updates to existing workflow improvements to integrations. So take a moment, kick up your feet, and get comfortable—we’re about to get started!
In this update:
- Hike partners with Westpac Bank
- Get on Amazon with Hike
- Employee timesheet management
- Employee timecard reports
- Role-based inventory notification
- Refund & void partially paid Laybys
- Accept bulk payments using integrated card terminals.
- Tax summary in register closure report
- Add items to an existing inventory count
- Supplier invoice due date (for Xero integration)
- Account statements
- Improvement for Mailchimp integration
- Save your label printing preferences
- Parked and Layby sales get their own receipt templates
- Option to omit parked orders from sales reports
- Refund & void partially paid backorders
- Do not print discount line on receipt if there is 0 (no) discount.
- Multiple outlet support for Shopify
- Offer discount details in sales by product type report
- Improved bulk update option for variants
- New currency support – Kwacha for Zambia
- Variants sorting option on sale screen
- Allow your customers to exchange products
Hike partners with Westpac Bank, giving Australian retailers a world-class payments option linked directly to their point-of-sale

We’re thrilled to announce our newest partnership with the Westpac Bank in Australia , providing Australian retailers a world-class payments option linked directly to their point-of-sale.
Retail businesses in Australia will be able to use Westpac Bank’s payment solutions with Hike on their iPad, Mac or PC to accept payments and make sales on-the-go, and automatically sync their payment data to eliminate manual errors.
Get on Amazon with Hike
- Available on One Store & Multi-store plans
Hike’s all-in-one retail management platform now integrates with Amazon, allowing retailers to easily manage their Amazon listings, customers, and inventory from the same platform as their existing sales channels.
We’re extremely pleased to offer the Amazon Marketplace integration as a built-in solution. And so, as a Hike retailer, you won’t have to pay anything additional to connect your Amazon Marketplace account with Hike.

Amazon integration features
Create and manage Amazon listings
Create all of your Amazon listings in Hike. Register your products in Hike to the Amazon catalog in minutes. No need for spread sheets.
Organise it your way
Set rules for region, pricing and inventory, ensuring your products appear where and how you want them to.
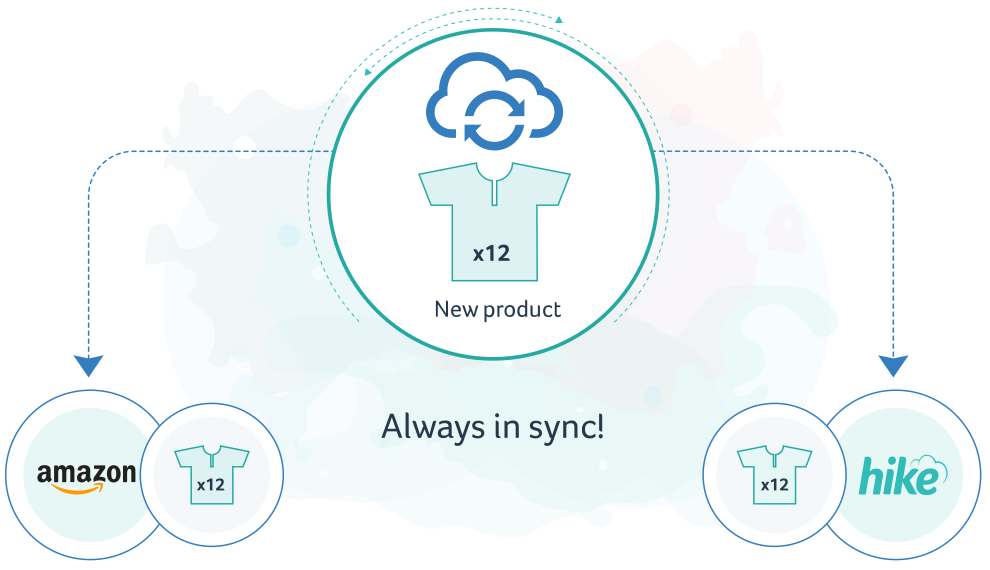
Always in-sync inventory & buffer stock
Control what’s sold on the marketplace and how many are sold, Hike even allows you to create buffers to help you avoid fulfillment headaches.
Read more
Employee timesheet management:
Staff clock-in & out + reporting
- Available on One Store & Multi-store plans
your employees can now clock in and out directly from the Hike point of sale register. You can access and review your employees’ timesheets from Hike reports within User reports section.
How it works:
To clock in or out, your employees can tap on a clock icon on top right (header) section of your Hike app on web and iPad.
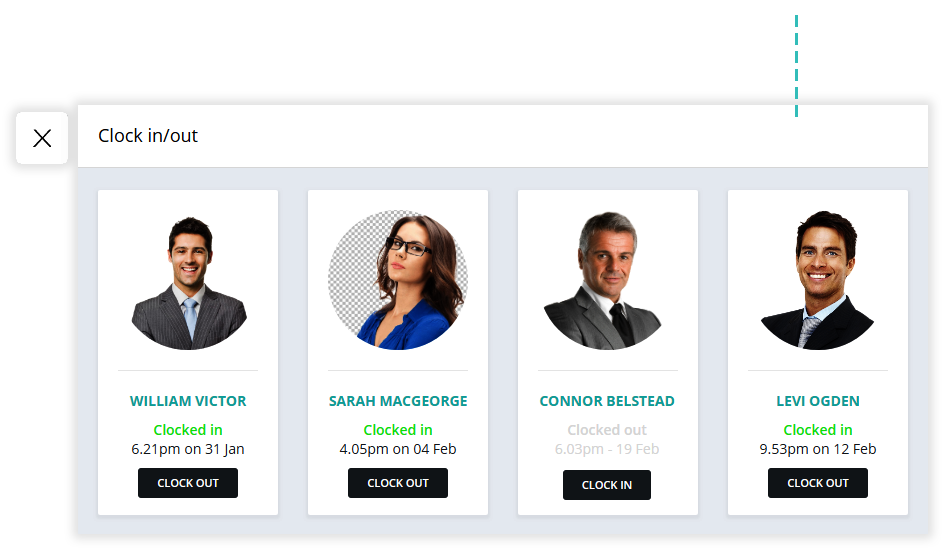
This will show employees list with their current clock in/out status. For each employee, a clock in or out button is also shown depending on their current status.
Here an employee taps on a Clock in/out button for own profile. Hike will prompt to enter a 4-digit passcode. (A passcode is issued to all employees at the time when their profile was created in the Hike.)
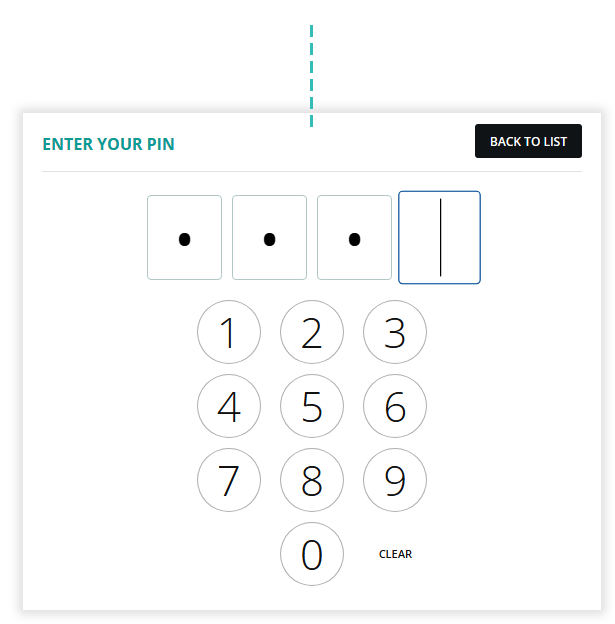
Once an employee has entered a correct 4-digit passcode, Hike will Clock them in/out.
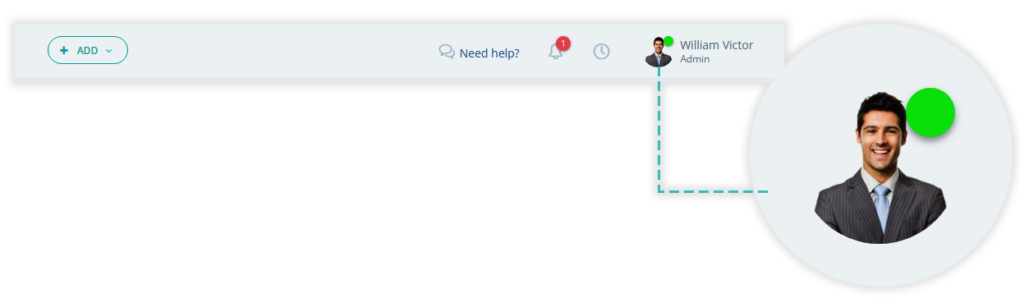
For clocked in employees, Hike will show a green dot icon on their user profile picture in the header section. Similarly, clicking on the clock icon shows all users in your organisation with their current clock in/out status so you can easily see who’s currently clocked and what time they started.
This also helps your employees know who else is in today in case if they need to reach out.
Employee timecard reports
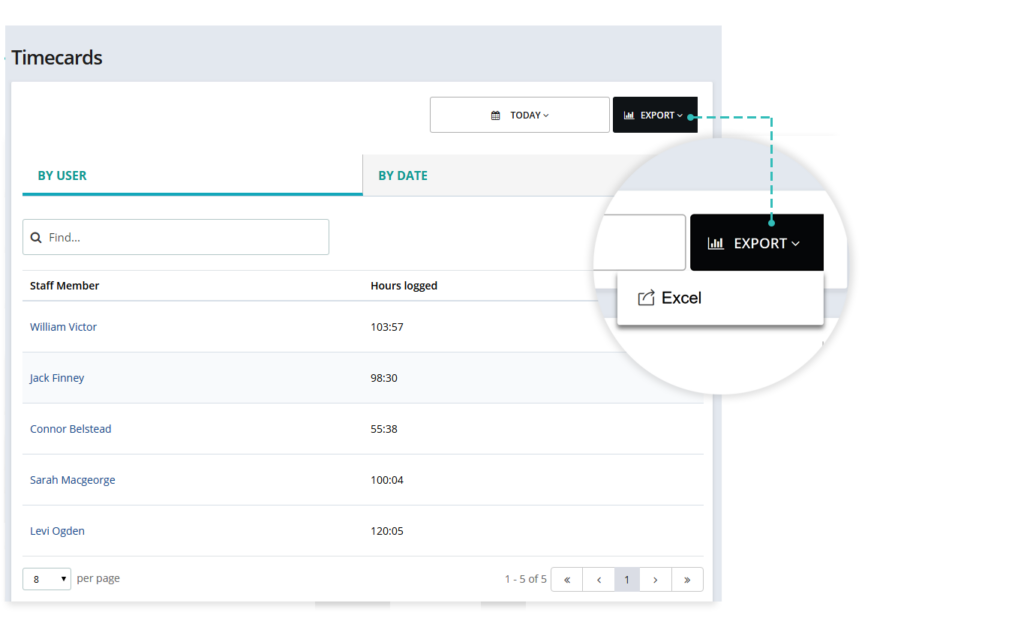
Access your employees’ timesheet reports from your Hike app’s reports & analytics section under User reports.
You can review timecards by user and also by dates. For both the options, you can select from following date range options:
Save label printing preferences
Printed label preferences are not something you’d change frequently. So, what’s the point of having to specify it each time you go to print a label? None.
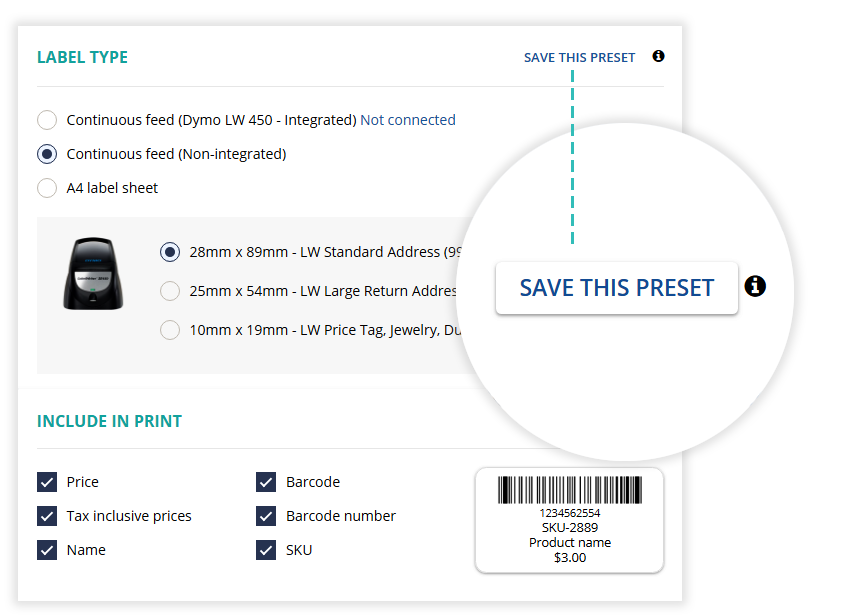
Now, with ‘Save this preset’ option, Hike will remember your label printing preferences. Once saved, the system will remember almost everything including label type, size and details you’d like to include to print.
Your saved settings will be there when you visit the labels print page next time. The Save preset option button will show only if you make any changes to your current preferences.
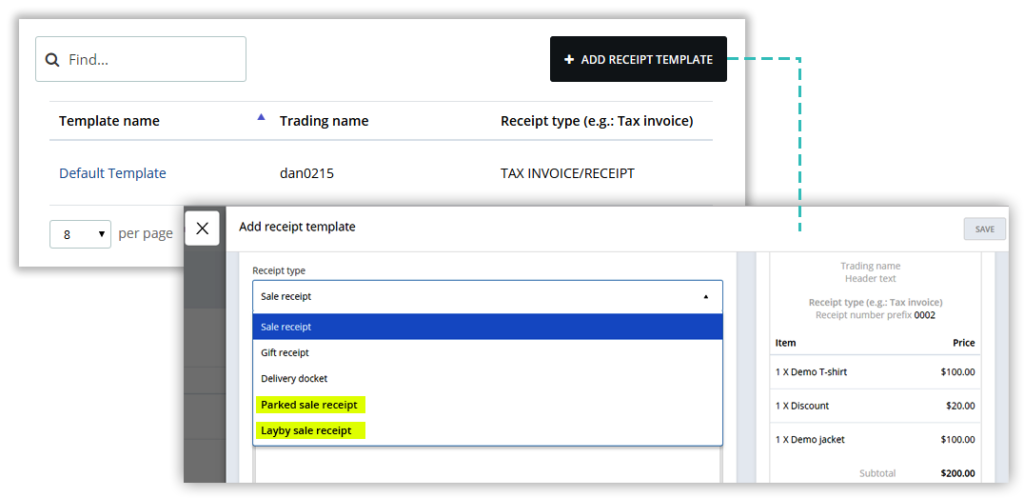
Parked and Layby sales get their own receipt templates
Until now, a single receipt template was applied to all Completed, Parked and Layby sales. Now, you can use a separate receipt template for each of these sale types.
For example:
- Use default receipt template for standard sale workflow
- Create a new template for parked sales receipt with header texts ‘Draft’ or ‘Quote’ depending on your sales process.
- Similarly, you can add a seperate template for layby sales and add Layby T&C in the receipt footer
How to
- Click on ‘+ Add receipt template’ and specify receipt template type, create your template and save.
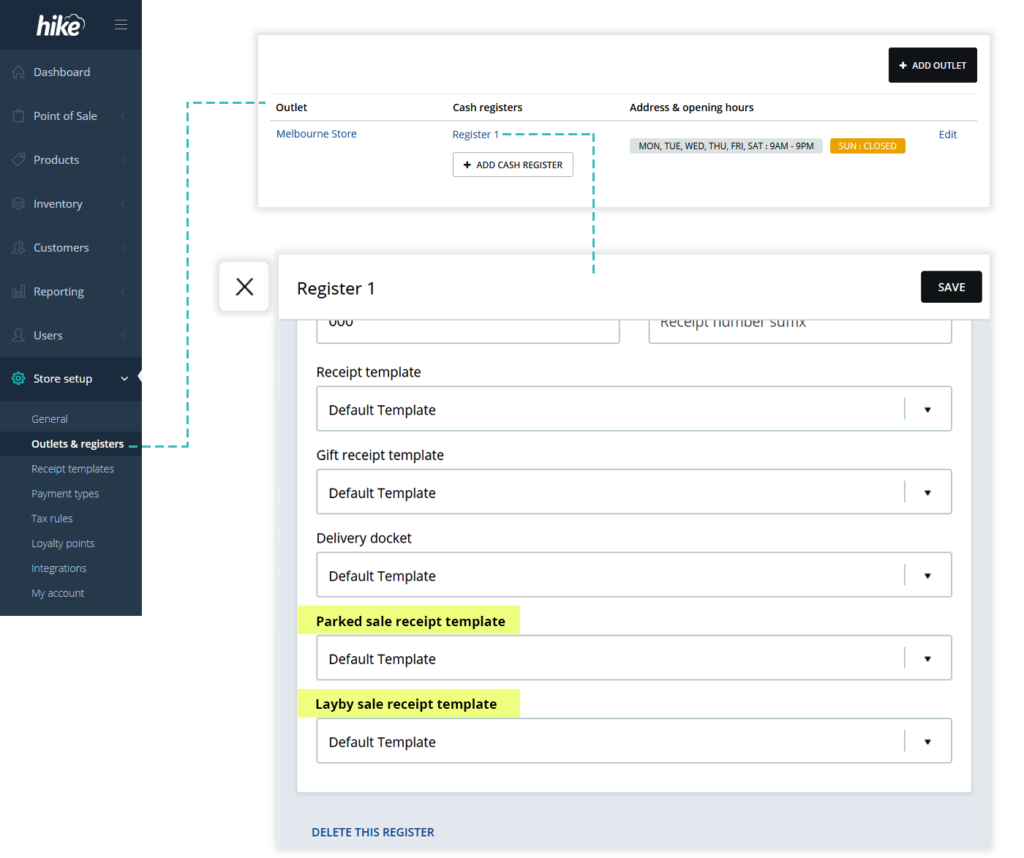
- Now, go to Outlets & Registers page, select your register
- On register detail view, make your selection for receipt templates by sale types
- Save changes
If no specialised templates for Parked and Layby sales are used, Hike will automatically apply your standard receipt template for these sale types.
Option to omit parked orders from sales reports
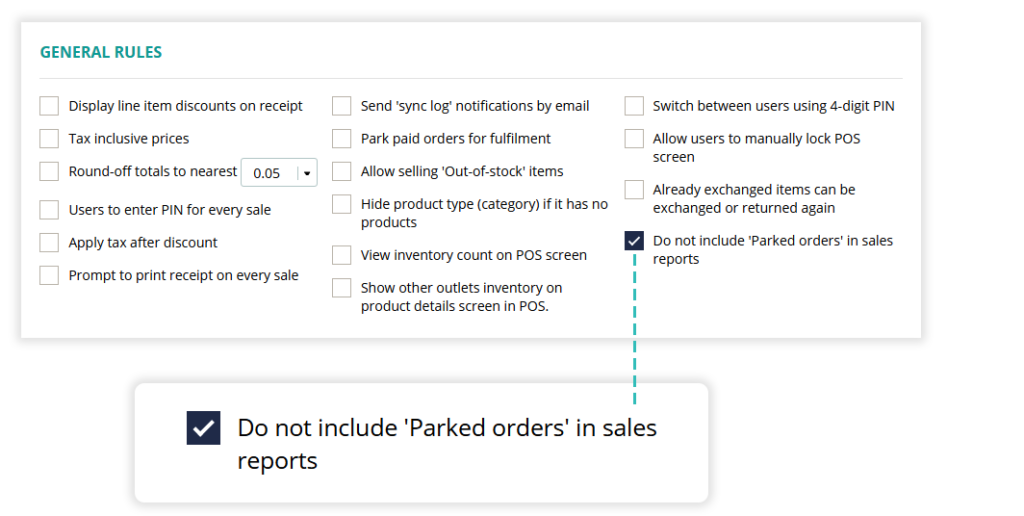
We’re always in try to bring you the data analytics that help you in making useful decisions. Sometimes small changes to the data can make a big difference. Now,with an option to view your sales reports with and without parked orders will provide you a great insight into total sales processed vs net finalised sales volume.
How to
To switch the parked sales in sales reports on or off, please go to Store setup > General settings > General rules and click on/off ‘Do not include ‘Parked orders’ in sales reports. Please note: if a Parked order is partially paid, the payment portion will still appear in a daily register summary even if the parked orders are omitted from sales reports.
Role-based inventory notification
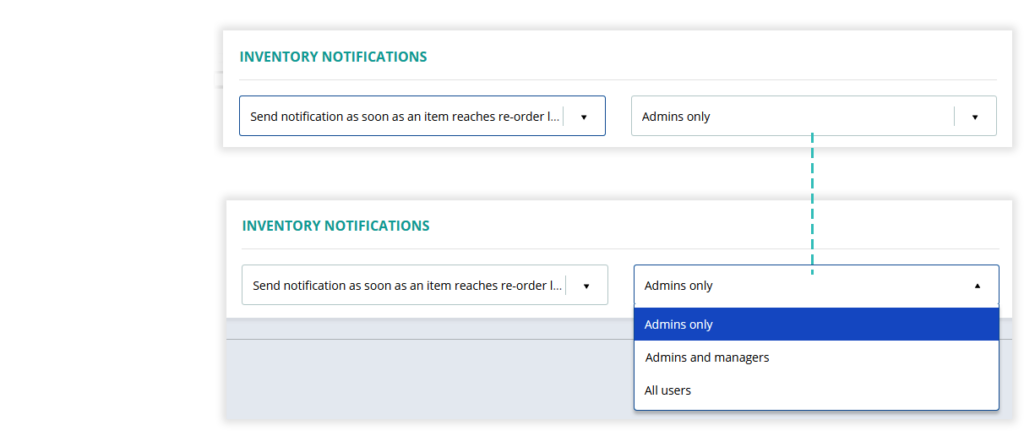
Previously, you could only turn the inventory notifications on or off (for all users at once). Now you can specify who receives inventory notifications based on their user roles. There are three options to choose from to send inventory notifications to:
- Admins only
- Admins & managers
- All users
Obviously, ‘All users’ mean no restrictions and ‘Admins & managers’ mean that Cashier users will not receive low inventory notifications and the first option as the name says, only Admins will get inventory notifications.
Refund & void partially paid backorders
</ul>
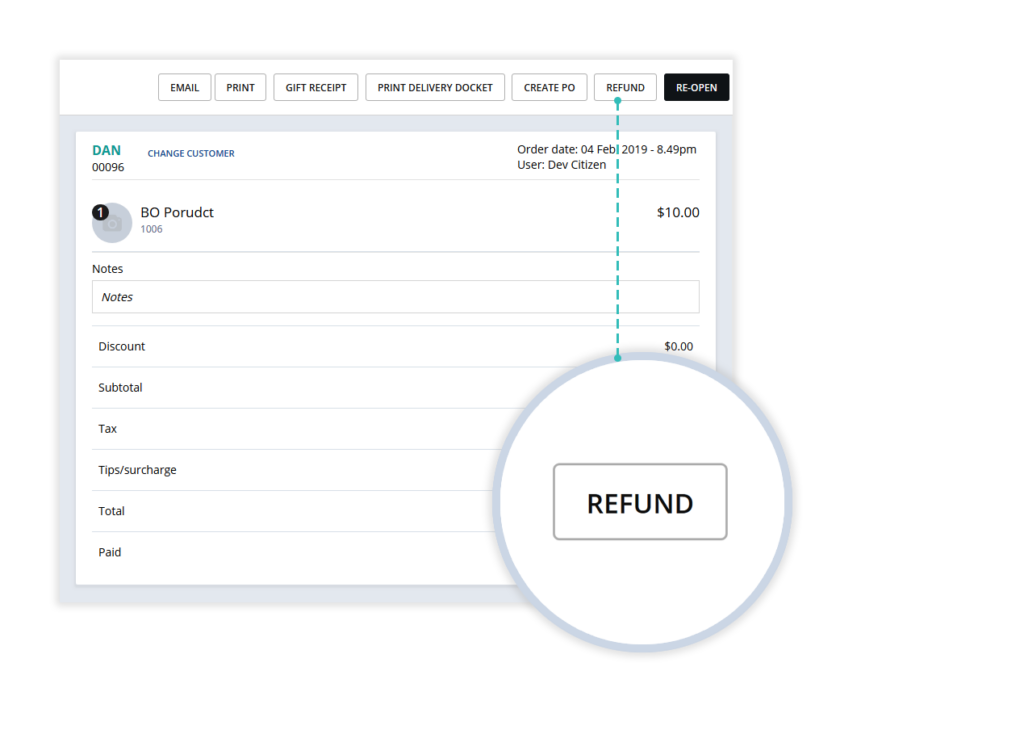
Now you can refund & void partially paid backorders in Hike. Maintain a proper trail of deposits, refunds and order cancellations.
How to
To refund a backorder, go to Sales history, click on order item. This will bring up the order details view. Click on ‘Refund’ button, located within the header section of the order view, to fully refund the order deposit.
(Please note: a backorder deposit can only be fully refunded. A partial refund on a deposit cannot be applied.)
Refund & void partially paid Laybys
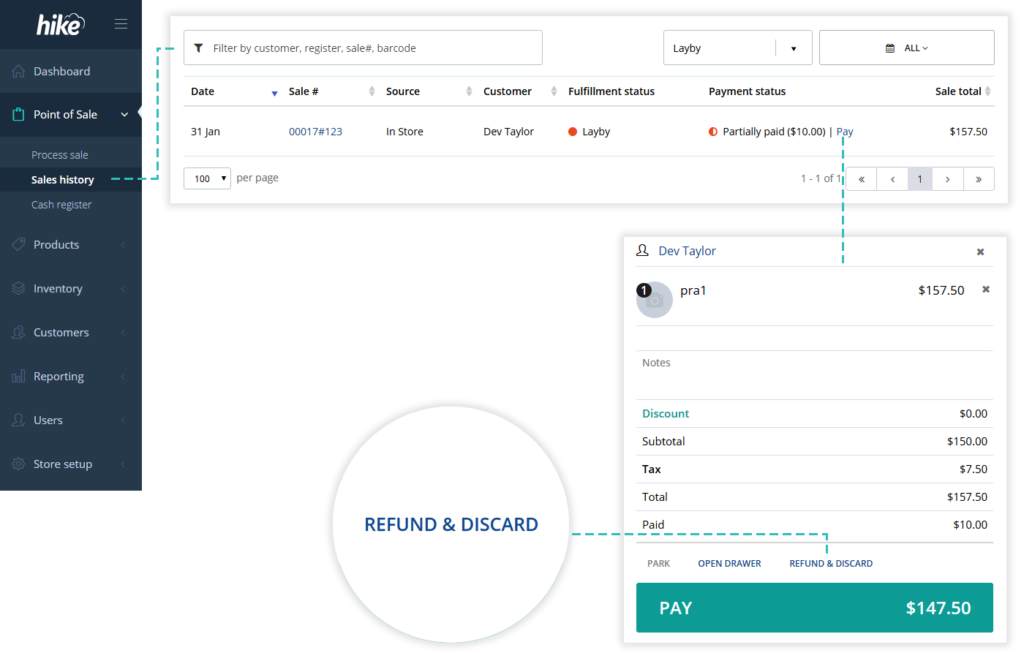
Now you can refund & void partially paid Layby orders in Hike. Maintain a proper trail of layby deposits, refunds and cancellations
How to:
To refund a layby, go to Sales history, click on order item. This will bring up the order details view. Click on ‘Refund’ button, located within the header section of the order view, to fully refund the order deposit.
Do not print discount line on receipt if there is 0 (no) discount.
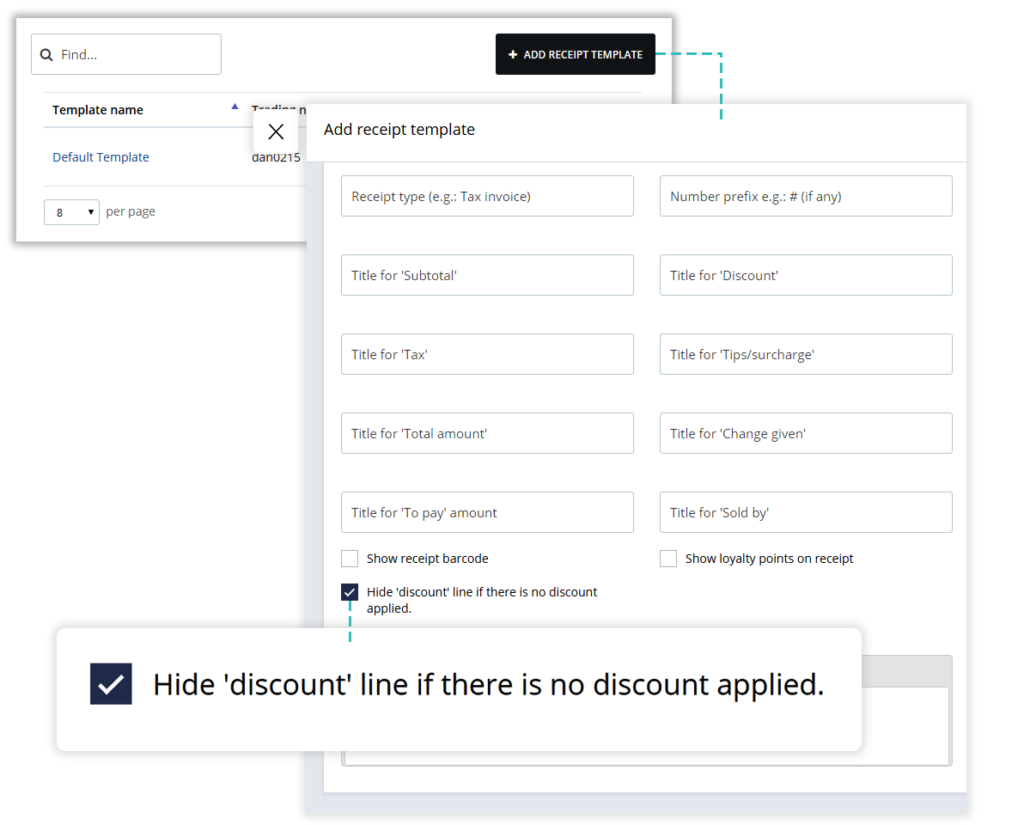
A new feature is added to sale receipt templates. You can simply check a box to print discount line on a receipt only when there is a discount applied to a sale.
Accept bulk payments using integrated card terminals.
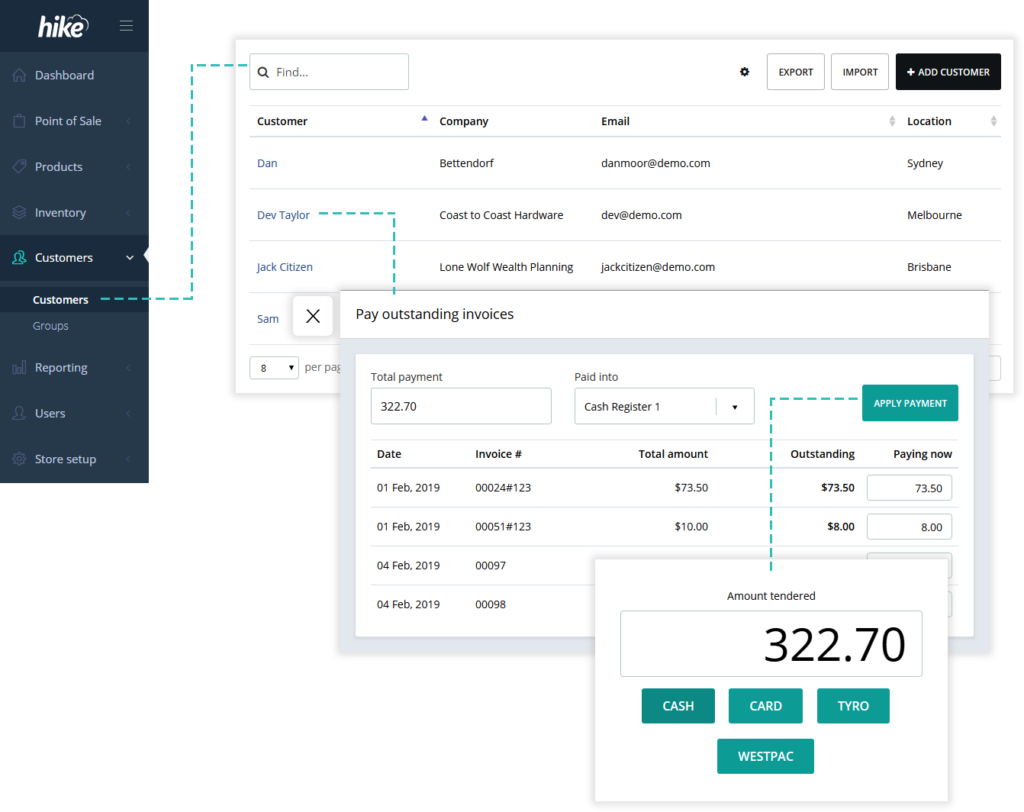
Hike supports ‘On account’ sales and lets you accept bulk payment using Cash and non-integrated card devices. With this update, you can now also accept card payments using integrated card terminals.
How to:
To receive a bulk payment or in other words, accept payment towards multiple outstanding invoices at once, navigate to the customers’ list. Now click on customer’s name to view customer details. Click to pay outstanding invoices and enter total amount. Confirm the amount distribution towards outstanding invoices. Once all look good, click on apply payment, select a payment method and finalise payment.
Multiple outlet support for Shopify
Shopify now supports multiple locations, which is a great news. For Hike users, we’ve made it even sweater with multi-outlet integration with Shopify!
For retailers using Shopify with Hike, our new integration allows them to link multiple outlets in Hike to their Shopify store. A greater control over inventory and fulfillment is the bottom line here. There are 2 different ways to set it up:
One to One
If you’ve multiple locations in Shopify, you can map each location against your outlets in Hike. This way, your virtual location inventories and products in Shopify are correctly mapped against actual fulfilment centres (retail stores) you have in Hike.
Once 1 to 1 location is activated, your online orders will be sent to the Hike outlet relevant to the Shopify location that received an order. Inventory deductions and updates are also linked in the similar fashion.
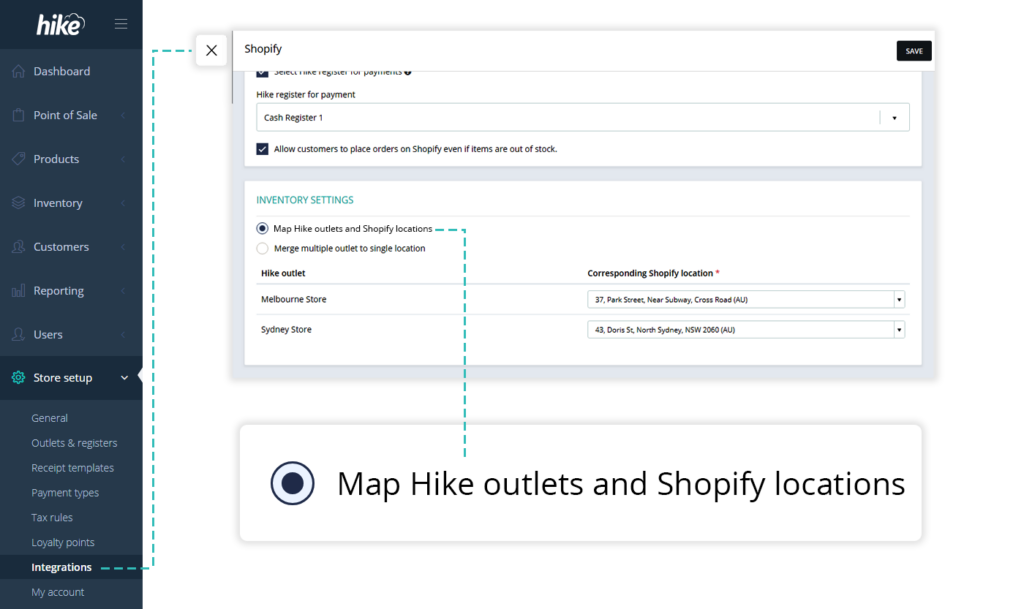
Many to One
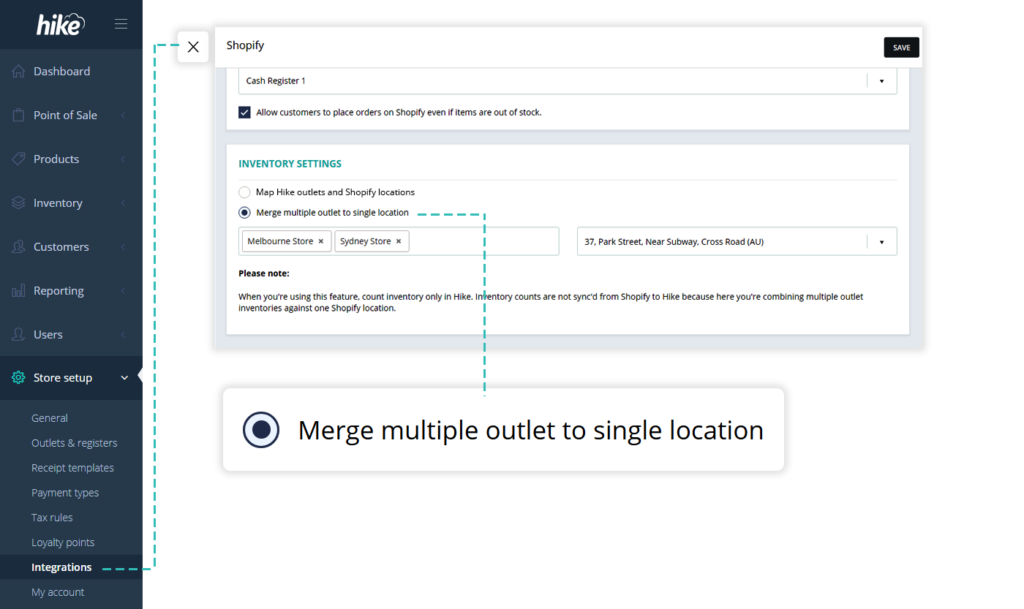
Have multi-outlet in Hike but have only 1 Shopify location? In this scenario, your current Hike and Shopify integration may be working just fine. However, there is now an additional option available
which may help you improve your online sales. Now Hike lets you link all your location inventory to a single Shopify location.
For example:
A ‘Cool Indigo Shirt’ product is stocked at all your outlets and you also sell it on your Shopify website. Currently one of your outlet is linked as a source outlet for Shopify which has run out of the shirt. So, your current integration will show the productas out of stock on Shopify.
However, with Many to One inventory setup for Shopify integration, Hike will show on Shopify the total inventory across all outlets.
Your source outlet can still be the same. What’s different is that your integration now knows that you can do the inventory transfer between stores so it will accept online orders as long as the item is available at one of your locations.
This is how it works:
- You specify a source outlet for Shopify integration. This is the outlet which will communicate your products and orders with Shopify as it used to previously.
- However, ‘available’ inventory on Shopify is now the total inventory for ‘Cool Indigo Shirt’ across all outlets
- Inventory is always drawn from your source outlet in Hike so if it runs out of the item, the inventory will be overdrawn, and the total inventory count will be negative.
- You can then arrange to transfer inventory from one of your other outlets to the source outlet. In some cases, you may add the transfer in Hike but dispatch it directly to a customer from the other outletif it suits your workflow.
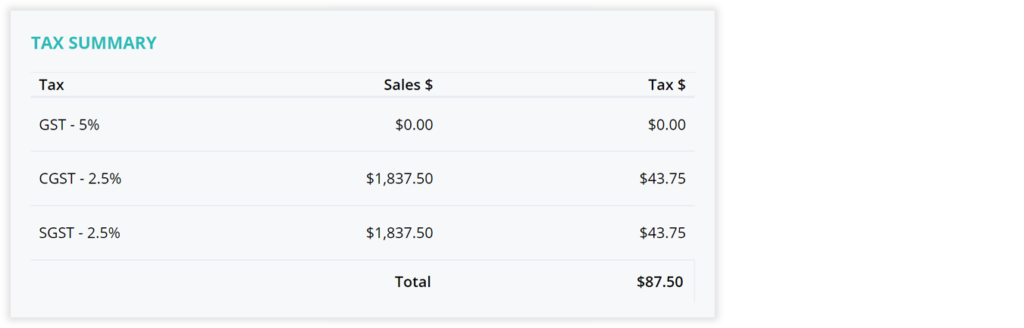
Tax summary in register closure report
An additional section added to the register closure summary report. Similar to the sales summary, the newly added tax summary includes break-down of taxes collected by rates and relevant sales amounts.
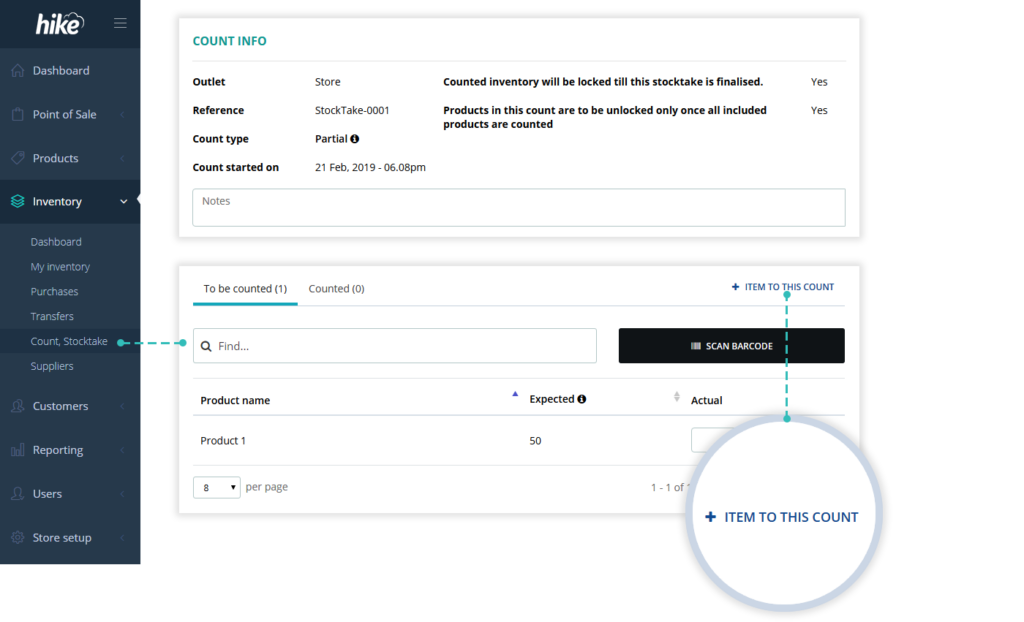
Add items to an existing inventory count
Now you can add more item/s to an existing partial inventory count as long as the count is not yet complete.
How to
Click on a ‘+ item to this count’ located above the count list. This will slide open a window where you can search and select items that are not already a part of the count.
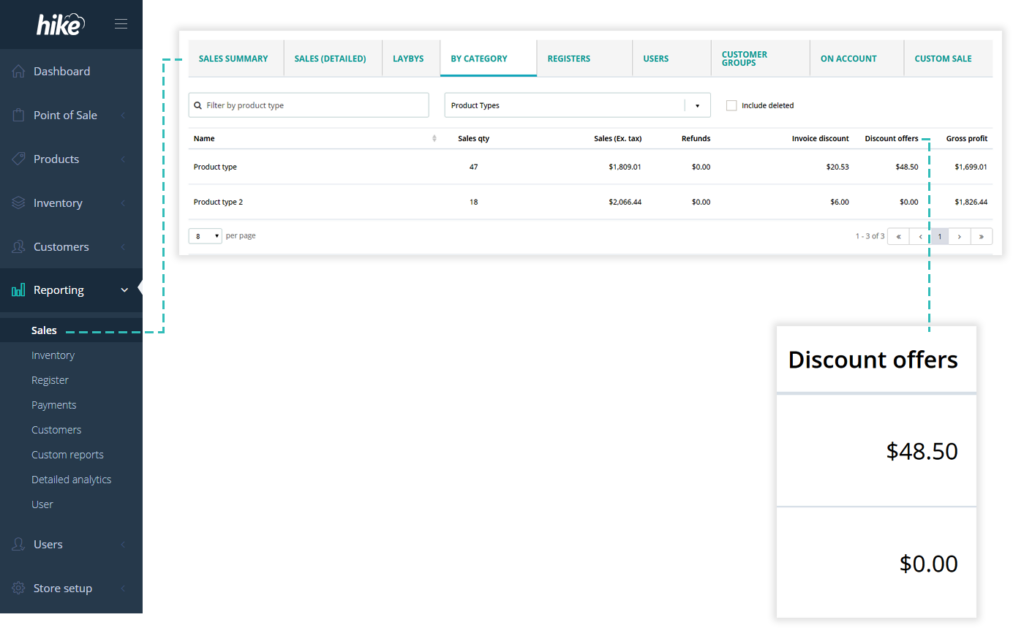
Offer discount details in sales by product type report
When reviewing your total sales by product type, get to know the total discounts you offered on each product type. This will help you gain a very useful insight into if and how offer discounts are impacting your sales targets. This will also help you analyse if discounts are more or less effective with any particular product types.
Supplier invoice due date (for Xero integration)
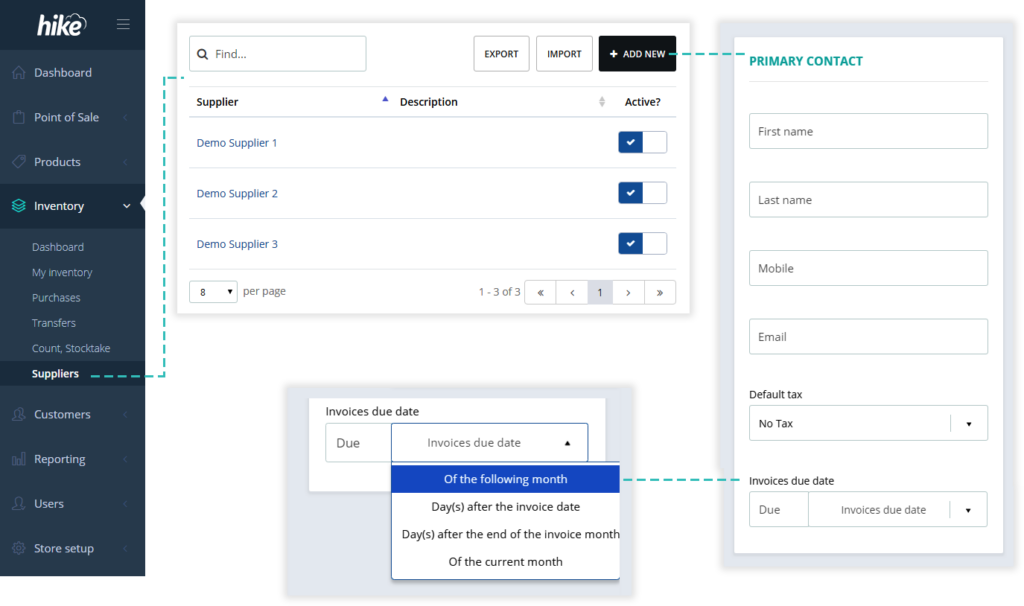
Now you can set invoice due date term in supplier profiles. The due date is then automatically applied when a supplier’s purchase order is sync’d to Xero accounting software.
How to
Specify ‘invoice due date’ when creating or updating a supplier profile
For existing supplier profiles
‘30-days after the invoice date’ is applied as a default payment term for all existing profiles. Go to Suppliers and tap on a supplier name to edit these terms.
Improved bulk update option for variants
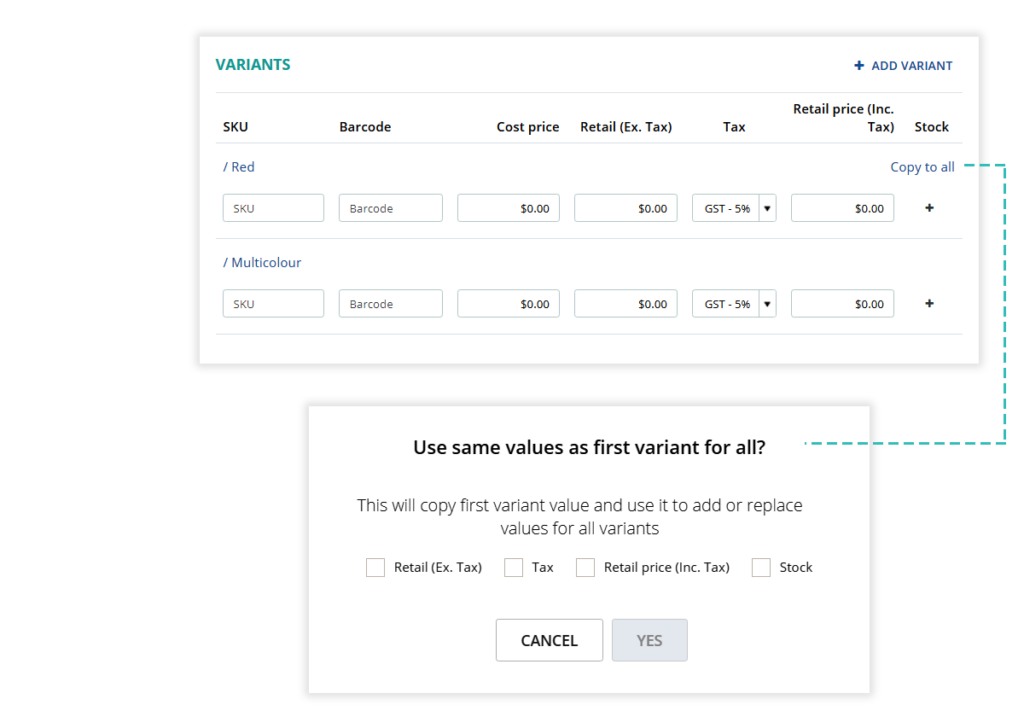
The ‘copy to all’ option for variants on a product details page comes in handy when making a same update across all variants. This option allows you to make changes to a first variant and copy the change to all variants.
We’ve made a slight yet mighty improvement to this feature which now allows you to select exactly which change/s you want to copy and paste to other variants.
The selectable options include Retail ex. Tax price, Retail inc. tax price, tax value and stock (inventory).
Account statements
- Available on One Store & Multi-store plans
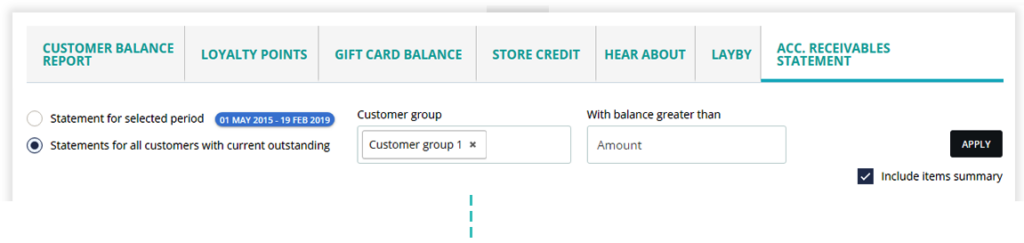
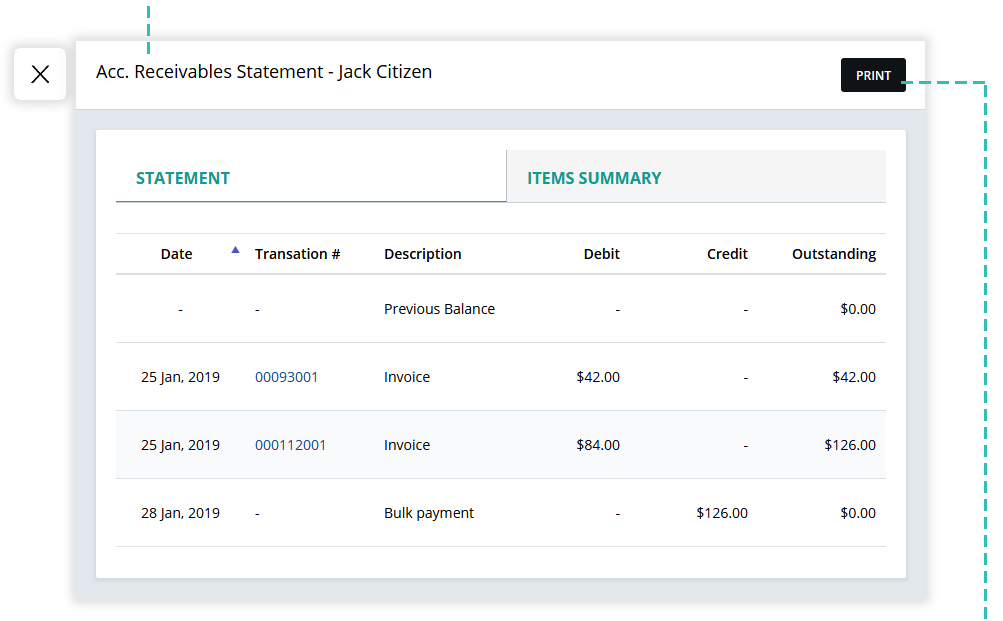
A new ‘Accounts receivable statements’ report is added for ‘on account’ sales and outstanding account statement. As the name suggests, this report will show on account sales and payments received for a selected date range.
Data filters
You can also filter out customers with no outstanding balance and/or no activity during the selected period. Further, you can filter the results by selecting customer group/s. You can also enter minimum outstanding amount threshold to exclude low balance accounts from the list.
List summary
Once all the relevant filters are applied, a list will be generated with customer names, contact details and outstanding balances. This can easily be used as an on-screen follow-up call list.

Details view
Click on anywhere in the list to view that customer’s itemized statement. The details include all the purchases and payment transactions for a selected data range period.
One click bulk printing
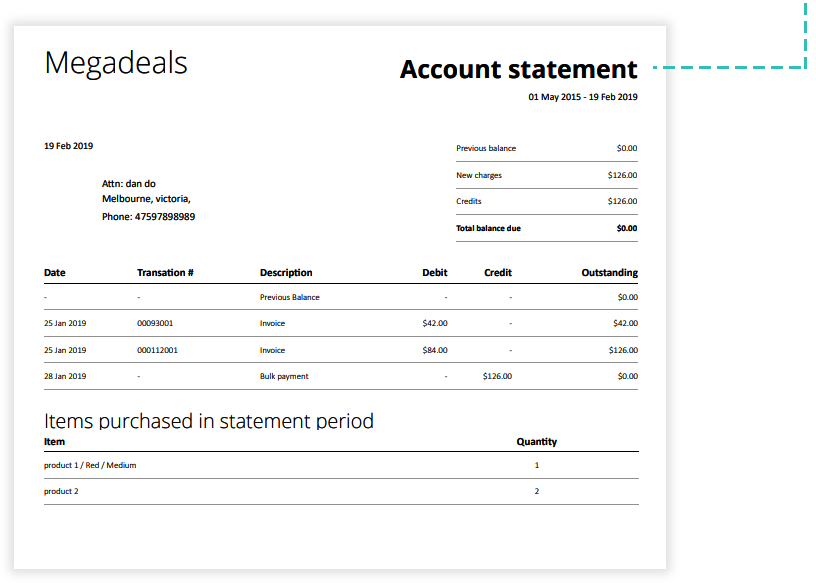
You can select and send all statements to print at once. An A4 sized printed statement will be generated for each customer. The statements are readily designed to be used with windowed envelopes.
New currency support – Kwacha for Zambia
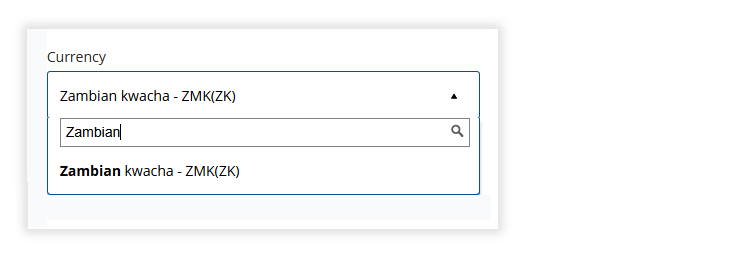
Hike now supports Kwacha as a currency and time-zone settings for Zambia.
Improvement for Mailchimp integration
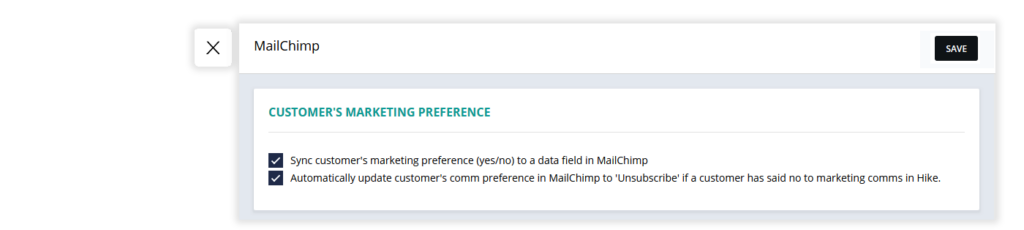
Improved Mailchimp integration support regarding customer’s consent for marketing communications. Updates are as below:
- You’ll be able to specify if you’d like to send customer’s Marketing preference as a column in customer list with preference mentioned as ‘Yes’ or ‘No’ for each customer line item.
- If a customer’s preference is no, you can choose to automatically ‘unsubscribe’ that customer from your Mailchimp mailing list.
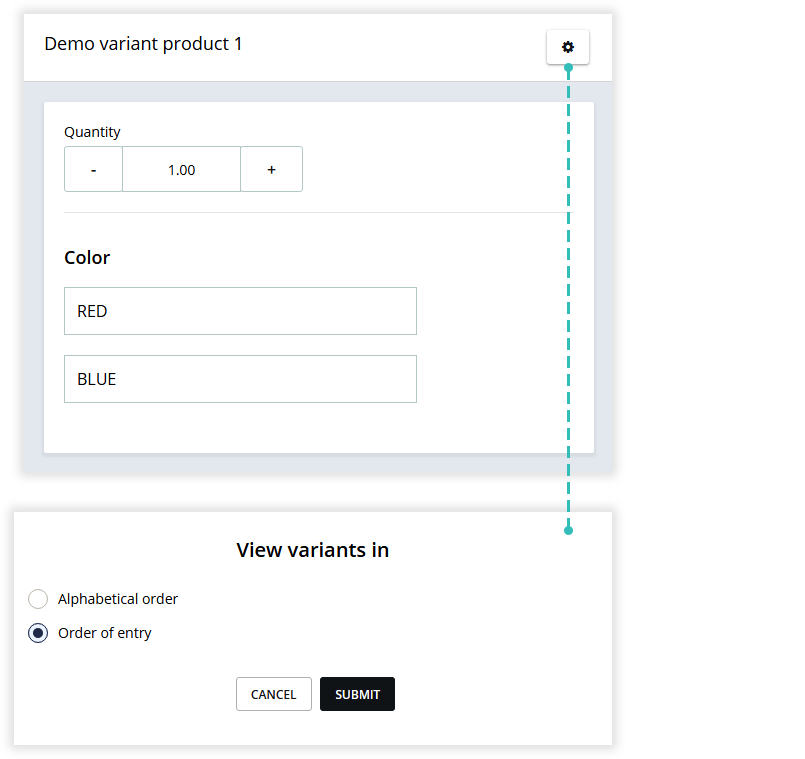
Variants sorting option on sale screen
A small yet useful feature is added on sales screen. For a variant product, now you can specify if you’d like to list all the variants in alphabetical order. The default selected sorting order is ‘order of entry’ which displays variants in the same order as they were entered in at the time of creating a product.
Allow your customers to exchange products
- Available on One Store & Multi-store plans
Hike already supports returns & refunds. Now you can also allow your customers to exchange products. Workflow for processing an exchange is very similar to processing a return.
How to
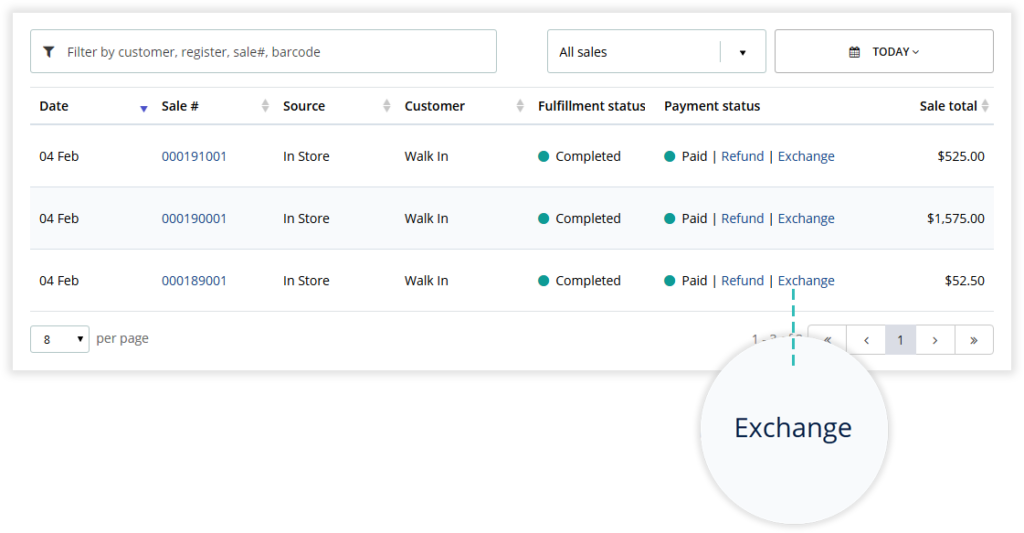
To process an exchange, tap on ‘Exchange’ button available on every sale transaction in sales summary list.
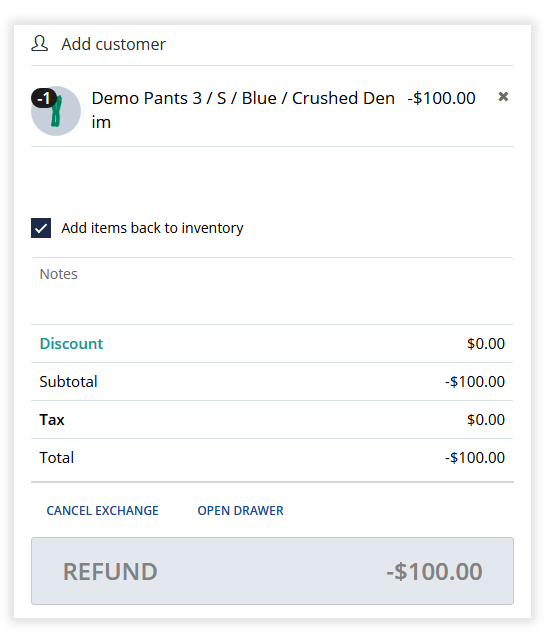
This will re-open the sale in ‘exchange’ mode. All the items in that sale are now displayed with negative quantity. Only keep the items and quantity that a customer is returning.
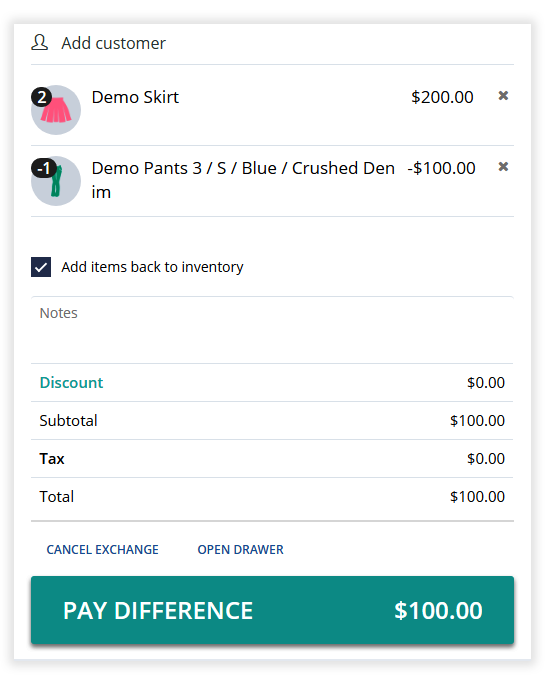
Now search, scan or tap to select an item that customer wishes to buy in exchange.
Hike will calculate the difference in amounts and prompt to process a payment or refund accordingly.
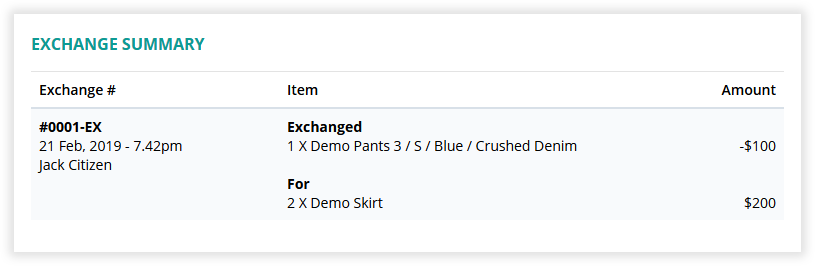
Exchange log
In an original sale, it will log exchange summary with details of the items exchanged and corresponding exchange transaction invoice number details.
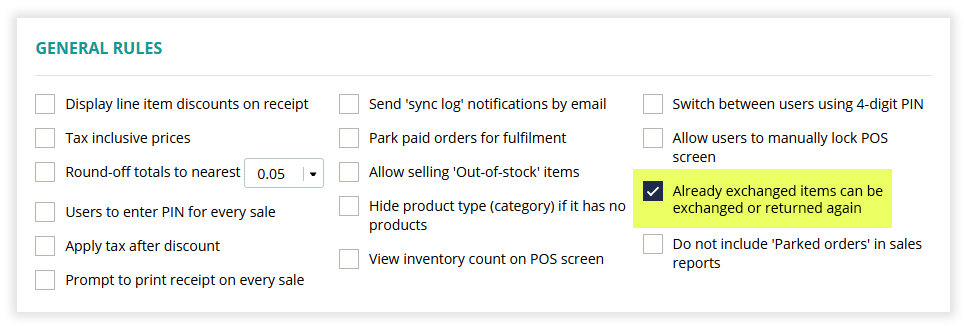
You control further exchange rules
You can define a rule regarding subsequent exchange in general settings. Here you can specify if an exchanged item can be exchanged again or not.